The Arch That Zak Built – How to Build Your Own Bridge
by Patrick Zakosek, RM-3336
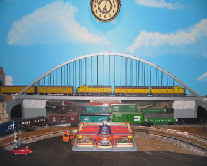
The Hell Gate Bridge is arguably the most famous railroad bridge in America, and it most certainly is with toy train enthusiasts. In engineering circles, it is known as a steel arch bridge.
It also is one of the most beautiful style of bridge ever built. The Bayonne Bridge in New Jersey and the famous Sidney Harbor Bridge in Australia are other examples.
I fell in love with steel arch bridges and have devised an easy way to build them using inexpensive materials from common hardware, home improvement or building supply stores.
My single-track arch bridge spans other railroad tracks, but you can use the bridge to span rivers, ravines, or even hallways. These plans can easily be altered to make a wider, shorter or longer bridge and, you can even convert it into a swing or liftout bridge with a few simple modifications.
I tested the bridge with his heaviest trains, and much to my delight, have found that the bridge neither sags nor shakes in the least; a truly beautiful, yet functional engineering marvel!
Bill of Lading:
(8) 1 1⁄4″ x 1⁄4″ x 6′ Wood stripsFinished Bridgelowres
(14′) 3/8″ x 3/16″ Bass wood
(20) 6-32 x 3′ Threaded rod
(210) 6-32 Nuts
(1) 2×6 x 6′ metal stud
(1) Can white spray primer
(2) Cans silver ‘hammered’ spray paint
Wood glue
Brads
Clamps
5/16″ drill bit
Drill motor
Safety glasses
And, other common house hold tools
I prefer to do construction within easy reach, on a 4′ x 6′ piece of plywood atop two saw horses.
The first step is to make jig on your worktable in order to bend the arches. Secure two blocks of wood with screws at one end of the table to form a 90-deg right angle corner. Measure the exact length of the bridge, including embankments. Using that measurement, secure two more blocks with screws at the opposite end of the worktable.
Next, cut the wood strips approx. 6″ longer than your blocks. Set one end of a wood strip in the jig and bend the other end to fit in the opposite jig. This will be the outside of your arch. Mark & cut the ends of the wood strip so that they fit flush with the bottom of the jig. Put two more strips under this strip, one at a time, cutting and fitting where necessary.
Now, take another wood strip cut to span length. Mark the center then put marks every 2″ in each direction, stopping short of the ends by 4″ or so. Drill this piece of wood out on the marks with a 5/16″ bit. Now place this piece under the arches forming a base. When you are satisfied with the fit of all pieces, glue the arch strips together as well as gluing the arch ends to the bottom strip. Clamp or nail with brads to hold together where necessary. Let dry. Remove any excess glue.
Repeat these steps for the other arch.
Transfer the holes in the bottom strip to the arch with a piece of rod or a ‘T’ square. Drill out the arch. Some holes near each end of the arch may need to be countersunk so the nut will fit flush. Cut the threaded rod for each hole 3/8″ longer than needed. Cut metal stud to fit the span. Lay the arch with the bottom strip in place on the inside of the stud. Mark holes on the stud and drill out. Also, mark the arch where the rolled edge of the stud intersects. Make a cut here with a hacksaw the width of the blade and the depth of the lip on the stud.
Now you are ready to assemble the bridge.
Place two nuts on each rod, spinning them in about an inch or so. Remove bottom strip. Start at the middle and working out. Insert a rod into the arch and cap with a nut. Insert other end into stud followed by a nut. Do this to all remaining rods.
Note that some rods closer to the ends will not need a nut on the underside of the arch due to the sharpness of the curve.
Secure the nuts until they all fit snuggly.
Cut the 3/8″ x 3/16″ basswood into 6″ pieces. Starting at the top, glue and nail these pieces between each arch and between each rod end, stopping short of the ends to allow for clearance. When dry, tighten – but don’t over-tighten – each nut. Working from the ends to the center and from the top down, ensure the rods are straight and taunt as you go. When done, cut any extra rod flush with the nuts.You are nearly finished now.
Sand any rough spots and fill in any holes or voids. Spray on a good coat of primer, let dry, then put on two coats of finish, allowing to dry between coats.
Lay down some track and you are good to go. Your friends will marvel the elegant structure, as well as your engineering skill and your trains will safely cross the deepest chasms in style.